Key takeaways
- Opening the Ally before checking software. A profile, calibration setting, or game-specific dead zone can mimic hardware drift.
- Spraying cleaner directly into the joystick. Excess liquid can travel farther than intended and leave residue or damage nearby components.
- Using canned air upside down. The propellant can discharge as cold liquid instead of air.
- Forcing the thumb stick past its normal travel. Pressing hard against the edge can worsen a worn mechanism.
- Skipping battery disconnection during a repair. Disconnect power internally before unplugging or replacing the joystick module.
- Buying a part based on appearance alone. Confirm that the listing specifically names the ROG Ally RC71L or your exact Ally variant; similar GPD or Pico-compatible listings may use different cables, mounting points, or caps.
- Over-tightening screws. Small screws can strip threads in plastic or distort a component bracket.
Stick drift on an ROG Ally can make menus scroll by themselves, pull your aim off target, or cause a character to walk without touching the controller. A small calibration error may be fixable in minutes, but aggressive cleaning, an oversized dead zone, or a poorly seated replacement module can make the controls less accurate—or leave the handheld unable to detect a stick at all. Start with software checks, then clean the stick externally before opening the case. Replace the analog module only when the problem persists.
This guide covers the original ROG Ally RC71L-style controls and applies the same careful approach you should use for comparable replacement modules in 2026.
Our top picks

As an Amazon Associate we earn from qualifying purchases at no extra cost to you. Ratings are shown as listed on Amazon.
What You Need
| Item | Why | Optional? |
|---|---|---|
| Microfiber cloth | Removes skin oil and loose debris around the thumb-stick collar. | No |
| 90% or higher isopropyl alcohol | Helps clean grime at the stick opening without leaving much moisture behind. | Recommended |
| Compressed air or a hand air blower | Blows out dry dust around the stick shaft. Use short bursts. | Recommended |
| Phillips precision screwdriver set | Needed to remove the rear screws and secure a replacement analog module. | Only for replacement |
| Plastic opening pick or spudger | Separates the back cover without gouging the plastic housing. | Only for replacement |
| ESD-safe tweezers | Useful for carefully handling the small stick cable connector. | Optional |
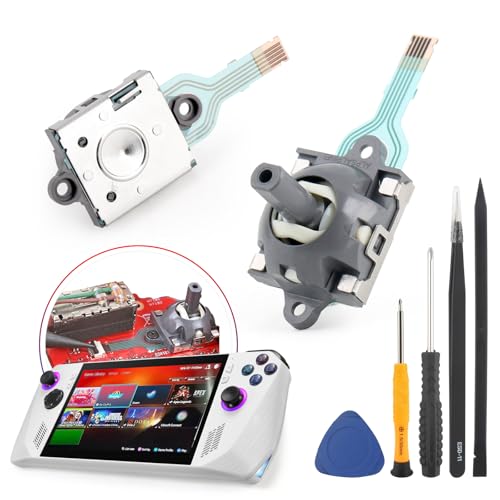
| Replacement analog-stick module | Replaces a worn or faulty joystick sensor assembly. Compatible single modules commonly cost about $12; two-pack kits with tools are often about $17. | Only if cleaning and calibration fail |
Step-by-Step
-
Confirm that it is truly stick drift (5 minutes)
Remove any controller grips or accessories that could rub against the thumb stick. Restart the ROG Ally, then open Armoury Crate SE and check the controller settings and joystick response display if available. You can also use a Windows game-controller test screen to watch the stick’s center position.
With both sticks untouched, the on-screen indicator should remain close to center. A slight, occasional movement may be filtered by a normal game dead zone. Constant movement, a stuck direction, or a signal that jumps dramatically points to drift or contamination. Test both sticks so you know whether the issue is isolated to one module.
-
Update and restart before changing hardware settings (5 to 15 minutes)
Install available updates for Armoury Crate SE, the ROG Ally system software, and Windows. Then perform a full restart. Controller behavior can be affected by profiles, remapped controls, or a temporary software problem, especially if drift appeared immediately after changing a game profile.
After restarting, retest with the desktop controls and in one game. If drift occurs only in a single game, inspect that game’s controller settings first. Reset its custom controller configuration and check whether a dead-zone setting was set unusually low.
-
Calibrate the affected joystick (3 to 5 minutes)
In Armoury Crate SE, open the gamepad or controller configuration area and run joystick calibration if the option is present on your software version. Place the Ally on a stable, level surface and do not touch either stick during the center-reading portion.
When prompted, move the affected stick slowly to its outer edge in a full circle two or three times. Do not force it against the rim. Let it return naturally to center, save the calibration, and test again. Calibration can correct a shifted center point, but it cannot repair a physically worn potentiometer or damaged cable.
-
Set a modest dead zone as a temporary or game-specific fix (2 minutes)
Increase the inner dead zone only enough to stop unintended movement. Start around 3% to 5%, then test. If the cursor or character still moves on its own, increase in small 1% steps. A setting above roughly 10% can make fine aiming and slow movement feel unresponsive, so treat a large dead zone as a sign that cleaning or replacement is needed.
Use this approach for a game with unusually sensitive controls or while waiting for a replacement part. It is not the best long-term answer for severe drift.
-
Clean around the stick without opening the handheld (10 minutes, plus drying time)
Shut down the Ally completely and disconnect its charger. Hold the affected thumb stick to one side. Use a few short bursts of compressed air around the exposed gap at the base of the stick. Rotate the stick and repeat around its full circumference. Keep the air can upright; spraying liquid propellant into the housing can cause damage.
Next, lightly dampen—not soak—a cotton swab with 90% or higher isopropyl alcohol. Wipe the outer collar and the stick shaft where it enters the housing while rotating the stick. Do not drip alcohol into the opening and do not use WD-40, cooking oil, or thick lubricants. Let the device sit powered off for at least 15 minutes before turning it on and recalibrating.
-
Replace the analog-stick module if drift remains (30 to 60 minutes)
Back up important files, shut down the Ally, unplug the charger, and work on a clean table with good lighting. Remove the rear screws with a correctly sized Phillips precision driver. Keep the screws organized by location; small handheld screws are easy to mix up or strip.
Use a plastic opening pick to release the rear cover gradually. Do not pry deeply or use a metal blade. Once inside, disconnect the battery before touching the joystick assembly. The analog module is secured near the top corner of the control area and connects through a small cable or connector. Take a clear photo before disconnecting anything so you can match the original routing and orientation.
Remove the module screws, release the connector gently, and lift the old module straight out. Install a compatible ROG Ally RC71L replacement module, reconnect the cable fully, and reinstall its screws without overtightening. Reconnect the battery, inspect that no cable is pinched, and snap the rear cover back into place before reinstalling the exterior screws.
Turn the Ally on, run calibration again, and test every direction, press, and click function before returning to a game.
Mistakes to Avoid
- Opening the Ally before checking software. A profile, calibration setting, or game-specific dead zone can mimic hardware drift.
- Spraying cleaner directly into the joystick. Excess liquid can travel farther than intended and leave residue or damage nearby components.
- Using canned air upside down. The propellant can discharge as cold liquid instead of air.
- Forcing the thumb stick past its normal travel. Pressing hard against the edge can worsen a worn mechanism.
- Skipping battery disconnection during a repair. Disconnect power internally before unplugging or replacing the joystick module.
- Buying a part based on appearance alone. Confirm that the listing specifically names the ROG Ally RC71L or your exact Ally variant; similar GPD or Pico-compatible listings may use different cables, mounting points, or caps.
- Over-tightening screws. Small screws can strip threads in plastic or distort a component bracket.
How Often
Clean the stick openings every 2 to 3 months if you use the Ally frequently, or sooner if you notice visible dust, sticky movement, or inconsistent input. A quick dry microfiber wipe after long sessions helps reduce oil buildup. Recalibrate only after a software update, a repair, or a noticeable center-position problem; routine recalibration is not necessary when the controls are working normally.
Analog modules do not have a fixed replacement schedule. Replace one when drift returns immediately after cleaning and calibration, the stick fails to reach full travel, the click switch becomes unreliable, or the controller test shows persistent movement at rest.
When to Call a Pro or Replace
Use a professional repair service if the Ally is still under warranty, if you are uncomfortable disconnecting the battery, or if the problem started after a drop, liquid exposure, or swelling in the case. Those symptoms can indicate more than a worn joystick module.
Also stop the repair and seek help if the replacement stick is not detected, both sticks suddenly fail, the display or speakers stop working after reassembly, or the battery connector and nearby cables look damaged. If repair costs approach a substantial portion of the handheld’s current value and there are multiple faults—such as battery issues, charging trouble, cracked housing, and stick drift—replacement may be the more practical choice.
FAQ
Can stick drift on an ROG Ally be fixed without opening it?
Yes, sometimes. Restarting, updating Armoury Crate SE, recalibrating, adjusting a small dead zone, and cleaning dust from the stick opening can solve mild drift. Persistent drift usually means the analog module needs replacement.
What dead-zone setting should I use?
Start at 3% to 5% and increase only until unintended input stops. If you need more than about 10%, the stick may feel less precise, and cleaning or replacement is worth considering.
Will a thumb-stick cap fix drift?
No. A cap can improve grip and protect the top of the stick, but it does not repair the sensor assembly underneath. Remove a poorly fitting cap during diagnosis because it can rub against the housing and feel similar to drift.
Should I replace one joystick or both?
Replace only the failed module if the other stick centers correctly and feels normal. A two-pack can be useful to keep a matching spare, but replacing a working stick is not required. After replacing either side, calibrate both sticks and test them in Windows and in a game.